Dental Services

Restoring Smiles – A Deep Dive Into Dental Implant Procedures

When it comes to smile restoration, Implant Dentist Las Vegas emerges as a robust solution with substantial benefits. However, the success of this procedure largely depends on your commitment to oral health and routine dental care.

Achieving a radiant smile involves a thorough clinical process that requires open communication with your dental team. With state-of-the-art treatments, sound advice, and your active participation, a rejuvenated smile is within reach.

dental implant

Bone Grafting

Bone grafting is a surgery that works to augment or rebuild the jaw bone where an implant may eventually be placed. This allows for a stronger foundation, which can help ensure that an implant is stable and long-lasting. It is especially useful when the implant site lacks sufficient density or thickness due to tooth loss, gum disease, previous extractions, or injury.

A dentist can perform bone grafting using a variety of sources, depending on your unique situation and the location of the area being treated. These include your bone tissue, donated bone from another person (an allograft), bone from an animal such as a pig or cow (a xenograft), and synthetic material. Choosing the right grafting material is crucial, as it can affect how well it heals and integrates with the natural bone.

Once the graft material has been incorporated into your jaw, it will need time to heal, which can take up to half a year. During this time, it is important to stick with your suggested oral care routines and keep up with regular dental appointments to ensure the area remains healthy. If any issues arise, they should be flagged immediately to allow for early resolution.

After the graft is healed, it is ready for implant placement. This is done by making an incision into the gum line and inserting the graft material into the jaw. This is then covered by a collagen membrane and stitched into place.

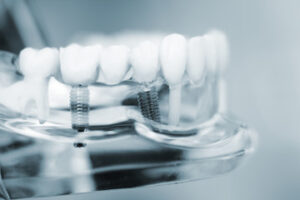
There are several types of implants available, including endosteal and subperiosteal. Endosteal implants are installed directly into the jawbone, whereas subperiosteal implants are placed on top of the jawbone. A bone graft is sometimes necessary before either type of implant can be placed because it increases the stability and strength of the implant.

A dental implant looks and functions much like a natural tooth, enhancing both the function of your smile and your appearance. The implant acts as a new tooth root, replacing the lost one, and helps prevent further bone deterioration by stimulating the natural bone tissue.

Implant Placement

Dental implants are the gold standard for tooth replacement treatment, offering unparalleled stability akin to natural teeth. They also help prevent bone loss by emulating the function of natural tooth roots, which encourages healthy jawbone growth and stimulates the fusion of bone cells at the implant site.

Before undergoing an implant-supported restoration, you will receive a thorough oral evaluation to ensure your dental health and overall suitability for the procedure. X-rays, CT scans, and an in-depth discussion of your medical history are all part of this comprehensive assessment. During this phase, your dentist can identify issues that could interfere with implant placement, including insufficient bone density.

If you’re missing one or more teeth, your dentist may recommend a bone graft to improve the amount of bone available for placement of an implant. This is usually required for patients who have been missing a tooth for an extended period, and it is a more complicated procedure than simple extraction followed by immediate implant placement.

Once the graft is fully healed, your dentist can proceed with implant surgery. A physical surgical guide is crafted from the virtual treatment plan, allowing your dentist to position the implant with greater accuracy and minimize errors.

After the surgical site is clean and prepared, a small metal piece called an abutment is attached to the implant. This will connect the crown to the implant, allowing it to blend seamlessly into your smile.

Following your doctor’s post-surgical instructions is critical for a successful recovery and the long-term success of your implant. This includes rigorous oral hygiene and frequent visits to your dentist for check-ups. These visits allow your doctor to assess the healing status of your implant, identify early signs of complications, and provide prompt solutions. It is also important to be attentive and recognize any persistent pain, swelling, or discharge from the surgical site so they can be addressed promptly.

Implant Restoration

Dental implants are a standout way to replace missing teeth, delivering aesthetically pleasing results that also enhance oral function and overall well-being. Unlike alternative solutions like dentures, implant restoration provides the benefit of a permanent fix that helps preserve your bone structure and prevents nearby teeth from shifting and becoming misaligned. As a result, it’s important to understand the full scope of the implant restoration process before embarking on this transformative journey.

During an implant consultation, your dentist will evaluate your dental health to ensure that you are a candidate for this treatment option. If there are any underlying issues, such as gum disease, your dentist will work to resolve these first before pursuing the dental implant procedure.

If your evaluation indicates that your jawbone isn’t sufficiently strong enough for implant placement, the next step is a surgical procedure known as bone grafting. Similar to how a foundation is laid for a home, this surgery creates new bone tissue to add structure to your jaw, ensuring that the implant can fuse with it effectively.

Once the recovery process following bone grafting is complete, your dentist can then proceed with implant placement. During this step, your dental implant will be inserted into the jawbone, where it goes through a process called osseointegration to become part of your smile’s foundation. A connecting abutment will be built on or placed over the implant, and the replacement tooth (dentist-selected depending on your unique needs) will then be affixed onto the abutment.

Once the dental implant has been fully restored, it’ll look and feel just like a natural tooth, allowing you to confidently smile again. The aesthetic of your implanted artificial tooth is carefully crafted to match your natural teeth’s size, shape, and color, giving your smile a fully functioning, perfectly natural appearance. With the right care, your implant will last for years and improve your quality of life. This is why it’s important to follow your dentist’s suggestions for brushing, flossing, and dental appointments to keep your implant in great condition. Taking this approach to your implant restoration can help you avoid future complications that would necessitate costly repairs or even a replacement of your dental implant.

Maintenance

After undergoing such a transformative dental procedure, you deserve to get the most out of your investment. That’s why it’s crucial to be well-informed and proactively address any signs of trouble with your implant. By doing so, you can keep your implants healthy and in optimal condition, allowing them to thrive and provide you with years of beautiful smiles.

Providing an aesthetically pleasing and durable tooth replacement solution, dental implants are made up of three main components: the implant, abutment, and crown. The implant itself is a replacement for the root of a missing tooth, fusing with the jawbone to restore its structural integrity and support a crown, bridge, or denture. The abutment is the connector between the implant and the crown, which is custom-designed to match the shape and appearance of your natural teeth.

Once affixed to the abutment, the crown resembles a natural tooth, bringing lifelike stability and beauty to your smile. This crown also stimulates the jawbone, preventing its degeneration and preserving the overall health of your mouth. By delivering superior aesthetics, durability, and functional performance, dental implants surpass alternatives like dentures and fixed bridges.

With meticulous oral hygiene and regular professional care, your dental implants can last a lifetime! But the journey isn’t over once you cross the finish line. Maintaining impeccable oral health and addressing any issues promptly is the best way to ensure your dental implants thrive, ensuring they remain the perfect foundation for your confident smile.

The complex intricacies of a dental implant may seem intimidating at first, but tackling it step-by-step can help make the process more manageable and approachable. As a result, the implant journey becomes an inspiring voyage towards your radiant smile. With the right team by your side, a dazzling smile isn’t just a distant dream; it’s a soon-to-be reality! With state-of-the-art treatments, sound advice, and your active involvement, that coveted smile is within reach. Let’s make it happen! Start your dental implant journey today. Schedule your appointment with our friendly staff. We look forward to seeing you!

Uncategorized

Revitalize Your Smile: Exploring Remineralizing Toothpaste

Teeth are constantly losing and gaining minerals, which is why it’s important to use a remineralizing toothpaste. These toothpastes return minerals like calcium and phosphate to teeth, preventing damage from acidic foods and drinks.

toothpaste

One type of remineralizing toothpaste is made with nano hydroxyapatite, which mimics the composition of natural tooth enamel. It has been shown to be as effective as fluoride in remineralizing teeth. Visit Website to learn more.

Minerals in your saliva like calcium and phosphate help repair microscopic damage caused by acid attacks and make teeth stronger. This is known as remineralization. However, if you have a sugary diet or don’t brush enough, these minerals can be lost. Remineralizing toothpastes use specific natural and synthetic substances to help remineralize teeth. This can prevent cavities and tooth enamel erosion if used regularly.

One of the most popular ingredients in remineralizing toothpaste is calcium carbonate. It strengthens the enamel and reduces sensitivity. It also helps fill in the tiny cracks and fissures that develop during demineralization. It also helps remove plaque and freshen breath. You can find this ingredient in a wide variety of toothpastes, including many natural brands.

Another common mineral in remineralizing toothpaste is fluoride. It strengthens the enamel, prevents decay, and helps reverse early tooth loss. It can also reduce the sensitivity of teeth to hot and cold. It is an important ingredient in most remineralizing toothpastes, but it’s also found in traditional toothpastes.

Several other minerals are also found in remineralizing toothpastes, including xylitol and baking soda. They are a safe and effective way to remove plaque and whiten the teeth. These toothpastes are often made without added chemicals and are available in a range of flavors.

Hydroxyapatite is another popular mineral in remineralizing toothpaste. It strengthens the enamel and fills in the micron-sized holes that can cause sensitivity to touch, food, and temperature. These holes are called tubules, and the fewer there are, the less sensitivity a person experiences.

Remineralizing toothpastes are a great choice for people with sensitive teeth or gums. They are formulated with natural ingredients and contain no triclosan, saccharin, sodium laurel sulfate, or artificial coloring. They are also vegan, comply with EU norms, and don’t contain endocrine disruptors or parabens. They are a good alternative to traditional toothpastes, and they can be used twice a day for best results. To use, apply a small amount of toothpaste to a toothbrush and brush for at least two minutes. Brush your teeth and gums at least once a day, and brush thirty minutes after meals.

Xylitol

Xylitol is a little bit of an unsung hero in the oral health community. Researchers have known for decades that xylitol has strong cavity-fighting powers, but they held off on recommending it to patients until they had substantial evidence that it was effective. Once they did, we saw a big surge of xylitol-containing products-gums, candies, baking goods, toothpastes, mouthwashes, etc.

This is because xylitol does a number of things that help keep the mouth clean and reduce tooth decay, including remineralizing eroded enamel. It has the unique ability to attract calcium and phosphate from saliva, which helps strengthen teeth that have been weakened by acid or worn away by tooth grinding. It also raises pH levels in the mouth, keeping them in an alkaline state that is more protective of weakened enamel.

Moreover, because oral bacteria cannot metabolize xylitol, they are starved of their favorite food and can’t produce the acids that cause decay. This not only decreases plaque, but it also decreases the amount of streptococcus mutans in the mouth, one of the main bacteria associated with tooth decay.

Another thing xylitol does is promote saliva flow, which keeps the mouth well-hydrated and improves remineralization between brushings. In addition, when xylitol is combined with hydroxyapatite (more on this amazing ingredient below), it enhances saliva’s remineralizing abilities.

Remineralizing toothpastes are all the rage in dental circles right now. However, most remineralizing toothpastes contain high amounts of sodium fluoride (NaF), which can be dangerous for children and pregnant women. That’s why it’s important to choose a natural remineralizing toothpaste without NaF. The Better & Better remineralizing toothpaste contains xylitol, which is safe for kids and adults, as well as other healthy ingredients like zinc oxide, turmeric, neem extract, and aloe vera. Plus, it doesn’t contain saccharin, triclosan, or alcohol, which are all common irritants in conventional toothpastes. To use, simply apply a small amount to your toothbrush and gently brush your teeth for two minutes twice a day.

Fluoride

The enamel that protects the dentin of your teeth from dietary acids is constantly being demineralized and remineralized. The remineralizing process can be accelerated by using toothpaste that contains fluoride. Remineralizing toothpastes typically contain a higher level of fluoride than standard toothpastes, to help penetrate the enamel and strengthen it.

Remineralizing toothpastes also often contain ingredients that help to reduce tooth sensitivity, which can be caused by a loss of enamel, or from mineral deficiencies. For example, some toothpastes include calcium to help fill in the microscopic cracks in your teeth called fissures that can cause sensitivity and lead to enamel erosion.

Another ingredient in remineralizing toothpastes is zinc hydroxyapatite, which can bind to the weakened areas of your enamel and remineralize it. This helps to prevent sensitivity from developing and can also repair white spot lesions, which are an early sign of tooth decay.

The remineralizing effect of fluoride is increased when it is combined with other minerals that are found naturally in your body, such as zinc and magnesium. These minerals help to remineralize your teeth and reduce sensitivity, as well as reducing the risk of cavities by making it harder for bacteria to adhere to your enamel.

It is important to note that while remineralizing toothpaste can be very beneficial for your teeth, it is not a cure-all. The best way to keep your teeth healthy is to brush and floss twice a day, and to rinse with water after eating or drinking something acidic. Also, it is important to visit the dentist regularly and to eat a well-balanced diet.

It is recommended to use remineralizing toothpaste once or twice a day, depending on your dental health needs. If you are prone to enamel erosion or sensitive teeth, you may want to use remineralizing toothpaste more frequently, such as after meals or snacks. However, you should always talk to your dentist to determine the most appropriate frequency for you. They will be able to advise you on the best toothpaste for your unique needs.

Hydroxyapatite

The calcium phosphate compounds found in tooth enamel and bones, such as hydroxyapatite, are able to bond to weakened tooth enamel and promote the remineralization process. Unlike fluoride, which is limited to only the surface of enamel, hydroxyapatite is able to bind with damaged enamel and remineralize the deeper layers as well, fortifying teeth and alleviating tooth sensitivity.

Remineralizing toothpastes increase the mineral content of a tooth’s existing enamel, making it stronger and more resistant to damage. They also help fill in the tiny cracks that can develop on a tooth’s surface during demineralization, preventing bacteria from sneaking inside and causing tooth decay.

A 2017 study published in the journal BDJ Open found that toothpaste containing hydroxyapatite helped reverse molar incisor hypomineralization (MIH), which occurs when the enamel of your molars or incisors loses its luster and becomes pitted and rough. This can occur due to a sugary diet and bad oral hygiene habits, which weakens the enamel by decreasing its mineral content.

In the study, researchers compared MIH treated teeth that had been used with either a fluoridated toothpaste, a toothpaste with calcium sucrose phosphate, or a remineralizing toothpaste containing zinc hydroxyapatite. They then took an SEM image of each group’s tooth to examine the results. The remineralizing toothpaste with hydroxyapatite showed the highest rates of remineralization and lesion depth reduction.

Upon closer inspection of the SEM images, they discovered that the hydroxyapatite particles were able to physically bind to and penetrate a damaged tooth’s enamel, as well as fill in any holes, scrapes, or imperfections on its surface, fortifying it and eliminating sensitivity. This is a result of the principal of dental biomimetics, which states that dental materials should mimic naturally occurring properties of the tooth.

Remineralizing toothpastes with hydroxyapatite can begin to show results in just a few weeks or months of regular use. But, to maximize the benefits of this toothpaste, it’s important to follow good oral hygiene practices, including daily brushing and flossing. Your dentist can help you create a personalized oral care routine that will best protect your teeth.

Plumbing

How to Prevent HVAC System Failures

Heating, ventilation and air conditioning systems are responsible for heating and cooling homes. They include products like furnaces, air conditioners and heat pumps, as well as ductwork and thermostats.

HVAC system design is important to maximize energy efficiency. Upgrade to equipment with higher SEER, HSPF or AFUE ratings, use programmable thermostats and maintain properly sized systems to reduce energy usage. Contact Hvac Lexington KY now!

HVAC systems use a lot of energy, which is why it’s important to have an efficient system that reduces electricity usage. One way to do this is by scheduling regular maintenance. This includes cleaning or replacing air filters, inspecting and cleaning the coils, and checking refrigerant levels. Another way to lower your energy consumption is by installing a programmable thermostat. This allows you to set a schedule for when you’re home and away, which can save you money over time. Finally, you can reduce your energy consumption by upgrading to a more efficient system. Newer models are designed to use less energy and may be eligible for rebates or incentives from your local utility company.

Many factors affect HVAC electricity consumption, including building occupancy and activity, weather conditions, and occupant thermal comfort. Climate-specific issues, such as hot summers and cold winters, cause HVAC systems to work harder, which increases their electricity usage. On the other hand, mild weather conditions require less energy for heating and cooling, lowering electricity usage.

Other factors that can lead to high electricity usage include a building’s structure, ductwork, and control systems. Oversized or undersized HVAC systems can waste energy by cycling on and off frequently, whereas insufficient insulation can increase air temperature fluctuations and cause the system to work harder. Additionally, poorly sealed doors and windows allow conditioned air to escape and unconditioned air to infiltrate the space, which increases energy usage.

Finally, the use of new technologies that can help to optimize HVAC energy efficiency is a great way to lower electricity usage and make your facility more green. For example, a ductless mini-split system uses less energy than a central system, due to the fact that it doesn’t have any ductwork to lose heat. In addition, these systems can be powered by renewable energy sources to further decrease their reliance on traditional electricity grids.

Uneven Temperature Distribution

When air is distributed unevenly within a building, it can cause different rooms to feel cooler or warmer than others. Addressing this issue can make for more comfortable indoor environments while minimizing unnecessary energy usage. Some ways that this can be done include addressing blocked or closed vents, adjusting the placement of heat-generating appliances, and utilizing duct deflectors to direct airflow.

One common reason for uneven temperatures is the lack of enough air return drops. This is important because the purpose of a HVAC system is to mix and change over air, but if there aren’t enough return drop outlets then this is not possible. Another common reason for uneven temperatures is the fact that heat naturally rises, so rooms on higher levels tend to be a bit warmer than those on lower levels.

Uneven cooling can also be a result of improperly sized or installed systems. An HVAC system that is too small for the space won’t provide sufficient cooling, while an overpowered system can cause short cycling – it will turn on and off frequently, never providing an even flow of cool air to all areas.

If you find that your home’s temperature varies widely from room to room, it may be time for an air balancing service. This is a specialized service that an HVAC professional will perform, but there are some simple DIY fixes you can try first. Check that your air vents are not blocked or closed, and regularly clean your ductwork to avoid leaks. If your home is insulated, consider increasing the amount of insulation to help achieve more balanced temperatures. You can also install smart thermostats with zoning capabilities, which allows for individualized climate control of specific zones or floors of the home.

Noisy HVAC System

A loud, rattling sound is a sure sign that something is wrong with your HVAC system. This could be as simple as debris stuck in your ductwork, or as complex as loose bearings within your fan unit or compressor. Either way, you should shut off your system and call a professional right away.

While some thumping sounds are normal, you should avoid hearing clanking or banging noises when your system is running. This could mean that there is a problem with the blower assembly and should be checked immediately.

Those who want to keep their homes as quiet as possible should consider adding insulation to walls, ceilings, and around ducts and vents. This will help reduce the amount of air that passes through the system, making it much quieter in the home.

Another way to decrease HVAC noise is to install a bypass duct that relieves pressure in a multi-zone system. It is important to consult an HVAC expert who has experience with this type of work before installing a bypass duct.

Other HVAC noises can be caused by closing too many supply ducts, which causes a loss of return air and leads to a buildup of pressure in the ductwork. This can lead to a hissing sound, which is a sign of damage to coolant lines or a refrigerant leak.

The clicking sound is the result of a communication issue between the thermostat and the HVAC unit. This means that the thermostat is trying to send a message to the HVAC unit and is being interrupted. While this might seem insignificant, it should be addressed immediately by an HVAC technician to prevent more serious problems.

Malfunctioning Thermostat

When your thermostat is malfunctioning, it won’t read indoor temperatures accurately. This leads to the system running for short heating or cooling cycles before shutting off again, putting undue strain on your HVAC equipment. The problem can also cause your system to overheat or underheat the space, leading to energy waste.

If your thermostat is not reading your home’s temperature correctly, you can test it by placing a glass thermometer next to the device. If it reads warmer or cooler than your thermostat, this is a sign that the device has lost calibration and needs to be replaced.

In some cases, a thermostat will simply stop working completely. If this happens, you should first check that the power switch is turned on and that the batteries are fresh. If the screen remains blank despite a new set of batteries, it is likely that the circuit breaker has been tripped. This is a common issue that can be easily resolved by checking your main electrical box and resetting the tripped switch.

If you’ve tried the simple troubleshooting solutions above and your thermostat still doesn’t respond, it is time to call in a professional. A licensed HVAC technician will have the tools, electrical knowledge and in-depth experience to get your thermostat up and running properly again. It’s important to schedule regular maintenance appointments for your system and thermostat to keep them in tip-top shape throughout the year. An experienced technician will know how to inspect and clean your thermostat, check and change the batteries, verify the wiring and make any necessary repairs. This will help ensure that your home’s temperature settings remain accurate at all times and reduce your energy consumption.

Dirty or Clogged Filters

Air filters are an important part of a home’s HVAC system. They keep contaminants like dust, mold spores, pollen, pet hair and dander from circulating the home’s air. But they can get dirty and clogged very quickly. This can cause a number of problems that affect the quality of the home’s air.

Dirty filters restrict the amount of air flow through the HVAC system, forcing it to work harder to cool the house. This can lead to overheating and even cause the system to shut down.

Changing the filter is an inexpensive and simple way to save energy and extend the life of your HVAC system. It’s also a simple way to help protect your health and that of your family.

One common indicator of a dirty filter is an increase in allergies, coughing or sneezing. This is because a dirty filter isn’t filtering out dust, dirt or other pollutants and they are being recirculated throughout the home.

Another common sign is a visible layer of dust or debris on the filter itself. This means it is time to change the filter.

Other causes of a dirty or clogged filter include the location of return vents in your home, the size of the filter and the number and type of pets in your home. Pet hair and dander can quickly clog a filter, as well as the ductwork that feeds it. This is why it is very important to regularly vacuum and brush your pet to reduce their shedding. Using the proper size filter for your home’s unique ductwork can also improve your system’s performance. If you have questions about your home’s HVAC system, contact Cool Today for a free estimate and more information on how we can help you.

Painting Contractor

Types of Painters

Painters Wilmington DE use different techniques, styles, and materials to create visual representations on a surface. They may specialize in a particular subject or medium, such as oil, watercolor, or acrylic paints.

In earlier cultural traditions, tribes, religions, guilds, and royal courts largely controlled the craft, form, subject matter, and imagery of painting.

Paintings are works of art created by applying paint to a surface, often a canvas. They are one of the oldest forms of artistic expression and have been used by artists like Leonardo da Vinci, Vincent van Gogh and Francisco Goya for thousands of years. A painting can be representational, abstract or a combination of both. It can depict a natural scene, object or narrative and can even contain a symbolic message.

Before beginning a work of art on canvas, most painters will do some small sketches to figure out how the composition will look and get a feel for the painting. Once these sketches are completed, a color study will be done. This will help the artist understand how colors will mix and what effect they will have on each other. After the color study is complete, it can be used as a guide to create the actual painting.

A paint palette is a flat surface that the painter uses to keep his/her colors separated and to mix them together. It can be as simple as a paper plate or as complicated as a plastic or wood palette that is specifically designed for this purpose. The use of a palette is important because it allows the painter to manipulate the pigments more easily. It also helps to keep the brushes clean. Most painters will also use a solvent such as turpentine to thin the paint and make it easier to work with.

The paints used in paintings are generally referred to as oil paints and are made of finely ground pigments mixed into a drying oil, which is usually linseed or poppy seed oil. The oil dries by a chemical change and turns into a hard enamel-like substance over time. Oil paints remain wet longer than other types of paint, which allows the artist to change the color, texture or form of the subject as it is being painted. It is necessary to work with oils in a well ventilated area, as the fumes can be quite toxic.

The painting is then applied to the surface of the canvas using brushes and sometimes palette knives. The surface of the canvas may be sanded to smooth it out or left rough, depending on the style of the painting and how it will be displayed. The final result is a unique and beautiful piece of art that can be treasured for generations to come.

Painting Techniques

There are a variety of painting techniques used by artists. Some are more controlled, while others allow for a degree of spontaneity and freedom not always possible with other methods. Splattering is an example of a painterly technique that allows for unique and expressive marks. This painting technique uses water-based paint and a brush to create a random pattern of drops, splashes or splotches. Painters can control the amount of pressure put on the brush and the type of paint used to vary the effects.

When working with oil paints, painters often use the layering technique. This involves applying thin layers of paint and allowing each layer to dry before adding another. This helps to prevent cracking of the paint and gives a smoother finish. This technique was popularized by painters like Monet and Van Gogh.

For watercolor paintings, a wet-on-wet wash technique is often utilized. This painting technique uses pigments diluted in water to create subtle, translucent layers on paper that can create luminous effects. Watercolor is a versatile medium that can be applied with many different methods to create unique, expressive works of art.

Another popular painting technique is the chiaroscuro method. This painting style uses light and dark colors to create dramatic contrast and depth in a work of art. One of the earliest proponents of chiaroscuro was the artist Michelangelo, who employed the technique on the Sistine Chapel ceiling.

A variation on the chiaroscuro method is sfumato, which refers to smoke-like blending of paint colors. Sfumato is favored by Renaissance painters and is evident in the Mona Lisa painting. Raphael also was a fan of the sfumato technique.

In the stippling technique, small dots are created to portray an image or subject. This painting technique is very time consuming and can be difficult to master, but it creates unique textures and effects that can add texture and dimension to a piece of art.

Acrylic paint pouring techniques are a fun way for beginners to experiment with painting. This painting method utilizes a variety of different colors and can be applied to many surfaces including canvas, wood and paper. There are several acrylic paint pouring techniques, but the clean pour and dirty pour are the most popular. The clean pour technique involves simply pouring one color at a time, while the dirty pour includes mixing multiple colors before pouring them onto the canvas. Then the paint is manipulated or tilted to create unique designs.

Painting Materials

Painting is a process of applying pigments to a solid surface and letting it dry to form an image. It is a versatile medium and can be used on many types of materials including canvas, paper and wood. Paint is available in both oil-based and water-based varieties.

Water-based paints are most commonly used because they provide a quick, easy and relatively clean method of painting. They come in a range of sheens from matt (which reflects less light) to silk. It is recommended that you start with matt and then experiment with the different sheens as you become more adept at the painting technique.

The raw materials that make up paint are binders, pigments and extenders. The binders offer toughness and water-proof features and help the other paint ingredients to spread uniformly on the painting surface. The pigments supply the color and are formulated from natural or synthetic materials. The extenders are additives that boost the volume of paint or increase its durability. Plasticizers are the other significant paint raw materials and they add flexibility to the paint.

An important part of the preparation for painting is the application of a primer. This is applied to the surface of the material before you begin painting, and it helps ensure that your paint will adhere to the surface. It also helps prevent the paint from cracking as it dries.

Other painting materials that can be used include encaustic paint, which is made from beeswax and damar resin (which is crystallized sap from fir trees). The wax provides hardness and luminosity. The damar resin helps to stabilize the mixture. In addition to the base medium, other ingredients may be added to paint such as driers, anti-skinning agents and plasticizers.

Another type of painting is tempera, which is an egg-based paint that has reached its height of popularity in the 15th century. It’s important to note that any leftover paint mixture must be discarded as only fresh eggs can be used for the preparation. In addition, great care must be taken to avoid mold growth.

Painting Styles

Painting is a versatile art form that allows artists to express themselves through a variety of styles and mediums. Whether you are an artist looking to branch out into new territory or just starting a custom painting project, learning about different types of painting styles and mediums can help you heighten your artistic expression.

Paintings come in many forms, from oil and acrylic paintings to watercolor and gouache. The mediums used in a painting may also affect the style of the piece, and each one has its own unique qualities that make it appropriate for certain kinds of images. For example, oil painting is a popular option because it allows for more control over the paints, and it can create a deeper and more realistic finish than other types of paint.

Watercolor painting is another popular choice for artists, and it’s one of the oldest forms of painting. The medium is comprised of pigments suspended in water, and it’s believed that the first watercolors were created around 5,000 years ago. The oldest known watercolors are found in Paleolithic cave paintings, and they were made by using a wet-on-wet technique. Watercolors are often used on paper, although a painter can also use other materials such as papyrus, bark papers, plastics and even vellum or leather.

Modern painters are also exploring other ways to paint, including digital painting. This style uses computers to create images that can be printed onto traditional canvasses. The process is fast and accurate, which makes it a good choice for portraits, landscapes and other subjects with intricate details.

Another type of painting is photorealism, which aims to create artwork that looks like a photograph. This style is very detailed and lifelike, and it can be difficult for viewers to distinguish between a real-life scene and the painting.

Other painting styles include impressionism and abstraction. Impressionism is characterized by quick brush strokes and an emphasis on the subject’s colors and light. This style was popularized by the French painter Claude Monet, who spent a lot of time outdoors painting scenes from nature. Abstractionism, on the other hand, is characterized by free-form and expressive brushstrokes.

Cleaning Services

What Is Commercial Cleaning?

Columbia MD Commercial Cleaning is a type of professional cleaning service provided by businesses in food establishments, offices, and more. Unlike janitorial services, these companies have the training and equipment to handle bigger cleaning jobs that don’t need to be done regularly.

Commercial Cleaning

Clean establishments create a positive impression on customers and employees and are safer for everyone. Using commercial cleaners helps to maintain hygienic standards and reduce the risk of disease.

The process of sanitising is a vital part of commercial cleaning, and is used to kill bacteria, viruses, fungus, and other microorganisms. However, it is important to note that sanitisation does not remove dirt or debris, and that basic sanitation must be performed before sanitising can take place. If sanitisation is not carried out correctly, it can be ineffective and may even lead to the growth of resistant microorganisms. To ensure that sanitisation is effective, it should be applied evenly and allowed to remain on the surface for the appropriate duration. In addition, it is important to remember that biofilms can envelop microorganisms and prevent the sanitiser from making direct contact with them.

When it comes to sanitisation, the key is to use a chemical that is capable of killing germs and other organisms. Most sanitisers are available as liquids or powders, and they are usually made from chlorine, hydrogen peroxide, or quaternary ammonium compounds. The effectiveness of sanitisers depends on the concentration and contact time, so it is essential to read product labels carefully.

Some commercial settings require sanitisation to meet specific hygiene standards, such as food processing plants or kitchens. Utensils and equipment that come into contact with raw foods must be cleaned and sanitised between using them to prepare different types of food, and before being used again for ready-to-eat food. Disinfectants are also often used in these settings to ensure that they comply with health and safety regulations, and it is important that the correct cleaning methods are followed when disinfecting.

As a result, it is important to find a professional commercial cleaner who understands the importance of maintaining high levels of cleanliness and hygiene in any workplace. Clean spaces are not only more aesthetically pleasing, but they can also help to reduce the spread of harmful viruses and bacteria. This is especially important in communal environments like offices, where sick days can affect team morale and productivity. In addition, sanitising and disinfecting can be particularly effective in locations that deal with hazardous materials, such as power stations or medical facilities.

Deep-cleaning

Deep cleaning is a value-added service that eliminates dust and germs, especially in high-traffic areas. It involves a combination of physical removal of dirt and grime as well as disinfection to kill germs. It usually requires more time, effort and expertise than daily services and complements them by enhancing the quality of the space.

While regular cleaning is important for every commercial property, it often isn’t enough to maintain a clean environment. When a space becomes dirty or dusty, it can negatively impact employees and customers and make the facility look unprofessional. When this happens, a commercial cleaning company can provide the necessary deep cleaning services.

There are many types of commercial cleaning companies. Choose one that has experience providing deep cleaning services to a variety of industries. They should have the skills and tools to thoroughly clean hard-to-reach spaces, such as ceilings and skirting boards. They should also be able to clean areas that require more detailed work, such as the inside of ovens and refrigerators.

Another thing to consider is whether a company offers services that are specific to your industry. For example, restaurants may need a more extensive degreasing of exhaust fans and kitchen ducts to reduce fire risk and meet safety requirements. Medical offices and surgery centers need a dual emphasis on detailed cleaning and sanitizing to protect patients from infection. Retail stores and showrooms need to make a positive customer impression and must be spotless to do so.

In addition to providing a professional and sanitary appearance, commercial cleaning companies can increase the productivity of your office by keeping the work environment healthy and organized. Cleaner and more organized workplaces are good for employee morale and can help to reduce the number of sick days your staff take. A professional cleaning company can save you the time and hassle of managing in-house janitorial staff. The cost of hiring and training cleaners can add up quickly, so it makes more sense to outsource these duties to a professional cleaning company. It can also be more economical in the long run, as you can avoid expensive carpet and furniture replacement costs.

Equipment maintenance

Commercial cleaners offer a range of services to keep businesses clean. Some specialize in specific types of premises or industries. Food processing plants, for example, are governed by strict hygiene regulations and need to be cleaned regularly to protect the health of their employees and customers. This may require using special cleaning solutions or following exacting protocols. Some commercial cleaners also use surface testing and bacteria meters to verify their cleaning results.

Commercial cleaning services often provide janitorial services as well, such as trash removal and sanitization of restrooms and break rooms. They may also take out waste and recycle it properly, reducing the risk of disease and environmental pollution. They can also clean windows and polish and wax hard floors to keep them looking nice and clean.

Depending on the type of work performed, some cleaning companies also offer equipment maintenance, such as lubrication, calibration, filter replacement and fluid topping up. They should consult the equipment manufacturer’s manual and industry best practices to create a maintenance schedule that fits with usage patterns and production cycles. They should also make sure that the maintenance schedule doesn’t interfere with normal operations.

Cleaning equipment needs regular inspections and maintenance tasks to extend its life and minimize downtime. Commercial cleaning companies may implement a preventive maintenance (PM) program to identify and address equipment problems before they become expensive repairs or breakdowns. PM includes routine cleaning and inspections, as well as proactive tasks such as assessing the condition of the equipment, scheduling planned maintenance activities, and tracking and recording the results of those activities.

Cleaning equipment is a major investment and needs regular maintenance to perform at its best. It’s important to consult the equipment manual for instructions and safety warnings, and to follow the recommended maintenance schedule. Some preventative maintenance tasks can be handled by trained staff, but complex technical repairs should be left to service professionals. Attempting these repairs without proper training can void the warranty. Some BSCs, therefore, choose to outsource their equipment repair tasks rather than hiring in-house technicians to handle the work.

Graffiti removal

Graffiti is a common problem that occurs in urban areas, and it can ruin the appearance of a commercial building. Aside from the fact that it’s an act of vandalism, graffiti can also create a perception that your business is poorly maintained. It can also be difficult to remove if left untreated, so it’s important to have professional cleaning services on hand to deal with it quickly and effectively.

Commercial cleaners use a variety of methods to remove graffiti, including chemical solvents, high-pressure washing, and abrasive cleaning. They will assess the surface type and nature of the graffiti to determine the best course of action. The goal is to remove the graffiti without damaging the underlying surface. It is also important to note that some chemicals used in graffiti removal are corrosive, so it’s vital to test products on small parts of the surface before proceeding with a full clean-up.

Another aspect of graffiti removal is adherence to local regulations. Many regions have laws and ordinances governing graffiti removal, and it is up to the professional cleaners to ensure they are meeting these requirements. They must be aware of any fines or penalties that may be associated with non-compliance.

The process of cleaning a building’s exterior is complex and time-consuming, and it can be easy to make mistakes that lead to damage or additional costs. While DIY pressure washers are available for purchase, it is best to trust a professional to get the job done right. The right cleaning products and techniques can ensure a graffiti-free exterior that will attract new customers to your business.

Commercial cleaners also provide odor removal services. Vandalism incidents often leave behind unpleasant odors caused by abrasive chemicals or contaminated surfaces. The odors can be difficult to eliminate, but cleaners will use deodorization techniques to restore a clean and pleasant atmosphere. They will also document and report on the impact of the incident to assist with insurance claims and legal proceedings. This is particularly helpful in cases where the property damage was caused by a vandal and not caused by normal wear and tear.

Plumbing

How to Become a Plumber

Cleveland Plumber install and repair pipes that supply water and gas to, and carry waste away from, homes and businesses. They must be able to read blueprints and understand complex construction methods.

Plumbers often collaborate with other professionals to ensure plumbing systems are integrated seamlessly into building projects and meet all required standards and regulations. They also must be able to identify and resolve issues like leaky faucets or clogged drains.

Today’s plumber does more than repair clogged toilets or replace sewer pipes. They also have a critical role in construction, oil and gas, and manufacturing industries. The plumbing industry is a growing one, and those who are willing to learn new skills can find opportunities with both residential and commercial service companies. The first step in becoming a plumber is to complete the necessary education and training. This can be done through an apprenticeship program or a vocational school with a plumbing program.

The minimum requirement is a high school diploma or GED certificate. If you want to become a master plumber, you’ll need more advanced education. Many vocational schools and community colleges have programs designed to prepare you for the career. You can take courses that focus on topics like plumbing codes, pipefitting, and blueprint reading.

In addition to classroom courses, you can also enroll in short-term training programs. These programs can be found at vocational institutes, community colleges, and online. Many of these programs are geared towards adults who have no prior plumbing experience and are looking to start their careers.

Some of the skills you’ll need to succeed as a plumber include customer service, critical thinking, and physical strength. Since you’ll be working directly with customers, you’ll need to be able to answer questions, explain complicated issues in simple terms, and give accurate estimates for the work you’ll do. You’ll also need to be reliable, punctual, and respectful of your clients’ property.

A well-crafted resume is essential when applying for jobs as a plumber. Describe your previous experiences, education, and certifications in the field of plumbing to highlight your qualifications. It’s also a good idea to network with other plumbers in the area and join professional associations.

Once you’ve completed your education and training, it’s time to get licensed as a plumber. You’ll need to meet state and city licensing requirements, which vary by location. To become a licensed plumber, you’ll typically need to pass an exam and have at least two years of experience. Some states offer continuing education courses for license renewal, which can help you stay up to date on changes in the plumbing industry.

Licensing and Certification

As with any profession, you must meet basic education and training requirements to start working as a plumber. Depending on where you live, this may include earning a high school diploma or GED certificate and completing a vocational program at a technical college or trade school. Then, to complete your education and prepare for work as a licensed plumber, you will need to enroll in a formal apprenticeship program or work at a plumbing company under a master plumber for several years. Some apprentice programs require a minimum number of hours to be completed, and others need you to pass specific exams.

Once you’ve accumulated enough experience in the field, you will need to pass your state or city’s licensing exam. This will require you to take and pass a written examination on state plumbing codes, regulations, and installation techniques. During the licensing process, you will also need to submit documents such as completed applications and forms, references, proof of financial stability and insurance coverage, and affidavits from previous employers attesting to your character and moral standing.

Then, once you have passed your exam and met all other qualifications, you can obtain a license from your local or state government to operate independently. In most states, this will allow you to design, plan, install, and repair plumbing systems for homes and commercial buildings. It will also give you the ability to oversee journeyman plumbers and supervise other employees in the field.

While the benefits of becoming a licensed plumber are significant, it’s important to note that most states don’t have a centralized professional licensing system for plumbing. Instead, most cities and counties handle their own licensing requirements, and you will need to check with your local government to determine the requirements in your area.

In states where licensing is not required, you can still work as a plumber by following the guidelines set by your city or county. However, if you choose to pursue licensing, it is highly recommended that you do so because it will open more opportunities for career advancement and will protect you from fines or other legal penalties for unlicensed plumbing work.

Work Environment

Plumbers work in a variety of settings and need to have physical stamina, good problem-solving skills, and strong attention to detail. They must also be able to interpret blueprints and building regulations in order to plan and execute plumbing installations. In addition, plumbers often collaborate with other professionals such as architects and construction teams to ensure that plumbing systems integrate seamlessly into building projects and meet all required standards and regulations.

Some of the most common work environments for plumbers include residential, commercial, and industrial settings. Plumbers working in residential settings typically install and repair plumbing systems in homes and apartments. They may also be called upon to perform emergency services such as fixing clogged toilets or leaking water heaters. Plumbers working in commercial settings, on the other hand, are likely to find employment in office buildings, retail stores, hospitals, or power plants. In these settings, plumbers are responsible for installing and repairing large-scale plumbing systems that serve many occupants at once.

Regardless of the setting, plumbers must have access to a range of tools and equipment in order to complete their duties. They also need to be able to adhere to strict safety protocols when working with hazardous materials or in elevated or confined spaces. In addition, they must be able to operate power tools and use a wide variety of diagnostic devices in order to identify issues with plumbing systems.

Those who want to become plumbers should carefully consider their long-term career aspirations and lifestyle preferences before embarking on this trade. Those who do not have the necessary physical strength or stamina will struggle to perform the duties of this profession, and those who prefer less hands-on work with fewer responsibilities may be better suited for other careers. Those who do not enjoy working with their hands and do not have the ability to follow detailed instructions will also probably struggle in this field. However, those who do well in team-focused environments and who can work effectively under pressure are likely to be successful as plumbers. Plumbers enjoy decent pay, and job security is high because plumbing systems are always in need of maintenance and repairs.

Job Duties

The job duties of a plumber involve installing, repairing and maintaining heating, water, drainage and gas line systems in residential and commercial buildings. Plumbers also perform inspections of pipe work and plumbing fixtures to identify potential problems and determine the best course of action for repair or replacement. Other responsibilities include reading and interpreting blueprints, sketches or schematics; locating underground piping; and cutting, welding or assembling pipes, tubing and fittings. Plumbers also must be able to solve complex problem-solving issues and handle customer inquiries and service calls.

Plumbers often install and connect gas lines to appliances such as stoves, ovens and water heaters. They must be familiar with local building codes and regulations to ensure compliance. In addition, they may need to obtain necessary permits and inspections.

Plumbing contractors and other employers post maintenance plumber job postings on their websites or use trade publications to find candidates. They interview applicants for the position and select those who possess a high school diploma, a trade school certificate or an apprenticeship, good technical skills, excellent customer service skills and the ability to work well with people.

During the interview, a maintenance plumber is typically asked to provide examples of their work history and what makes them qualified for the job. They should also be comfortable working with customers and explaining plumbing issues in a clear and concise manner. A strong sense of customer service is especially important for this role, as plumbers frequently interact with home and business owners to schedule appointments or to resolve plumbing problems. The ideal candidate must be punctual, dependable and respectful of the client’s property. Plumbers must be able to lift materials and equipment on a regular basis, as well as climb ladders to access overhead pipes. The work environment is sometimes noisy or dusty, and the plumber may be required to wear a protective mask when working with certain chemicals or gases. The physical demands of the job include frequent stooping, bending and reaching as well as lifting up to 50 pounds on a regular basis. The ability to climb stairs is also required.

Insulation

Ceiling Repair 101: A Step-By-Step Guide To Fixing Common Issues

A poorly functioning ceiling can lead to mold, structural damage, and a host of other issues. Prompt repair is key to preserving the beauty and function of your home’s interior.

Cracks in the ceiling usually signal a problem that’s coming from above. A professional Ceiling Repair Perth will need to trace the cause and fix it before moving on to repairing the ceiling itself.

insulation

Drywall Repair

Whether caused by an unfortunate toilet leak or a hail storm, damaged drywall will not only detract from your home’s aesthetics but can also cause further damage and lead to costly repairs. Fortunately, most of these problems are fairly easy to fix yourself. All you need is the right knowledge, some basic tools, and a little bit of patience. With the help of this comprehensive guide, you’ll be able to tackle anything from hairline cracks above the door to a sagging ceiling.

Horizontal and vertical drywall cracks are usually the result of house settling or lumber shrinkage. These cracks can easily be filled with a thin application of joint compound (also known as mud), but it’s important to use mesh tape to dissuade future cracking. This will ensure that any future drywall repairs are made underneath the tape, rather than on top of it.

Nail and screw pops are another common issue. To remedy these, use a utility knife to cut away any excess drywall material and then sand the hole until smooth. Next, apply a thin layer of joint compound and let dry. Once the compound has a chance to dry, apply a second coat and sand again until smooth.

If you’re working on a large section of wall or ceiling, make sure to locate the studs with a stud finder to avoid cutting into any utilities. Also, be sure to wear a face mask and eye protection to avoid any unnecessary breathing in dust or dirt.

Before beginning a repair project, be sure to move any furniture or lay down a drop cloth to protect your flooring. Next, put on your face mask and gloves and prepare the work area. Depending on the size of your patch, this might mean moving any furniture or covering any carpeting with a protective sheet. After sanding the patched area, you can fill it with spackling paste or joint compound, using a putty knife. After applying the compound, be sure to sand it until smooth and let it dry according to the manufacturer’s instructions.

To fix larger holes, you can use a drywall patch kit. If you prefer a more natural finish, hardware stores sell small cans of spray-on texture material. This type of texture is more subtle and blends in much better with existing walls than pre-textured drywall.

Staining

Stains on ceilings aren’t just unsightly — they can indicate a serious problem, such as a leaking roof or broken pipe. Leaks that go untreated can cause mold and rot, creating an environment that is unhealthy for you and your family.

The first step in addressing water stains on your ceiling is to find the source of the leak and make any necessary repairs. Leaks that appear on the ceiling usually originate from a roof area or an upper-level bathroom, and can sometimes be difficult to spot. If you can’t locate the source of a leak, place dehumidifiers around the area to help keep humidity low.

If a ceiling stain discolors the plaster without breaking a taped seam, mist the affected area with a spray bottle and a strong bleach-and-water solution. Repeat the treatment every 10 minutes for a few hours to fade or lighten the discoloration. As you do so, be sure to protect the floor below the ceiling and cover any fixtures with plastic sheets to prevent drips. After several hours, wipe the area clean with a sponge saturated in a bleach solution, then rinse and dry the ceiling with a towel.

When drywall and plaster are subjected to constant streaming moisture, they eventually wear down and become brittle. This causes the joints to loosen, which is why it’s important to keep humidity in your home or business low.

Ceiling cracks can also be a sign of structural damage or problems with the foundation of your building. Depending on the severity of the crack, it may be best to contact a professional surveyor or construction expert for advice.

Straight cracks in ceilings usually result from inadequate taping and mudding during a drywall installation. To repair these cracks, apply drywall compound ($7 to $15 a bucket) to the crack and press in some new tape ($2 to $5 per roll). Use an eight-inch knife to spread a skim coat of joint compound over the repaired area. After each skim coat, sand the surface with 220-grit sandpaper until smooth. Finally, roll on a coat of Kilz UpShot primer and two topcoats of ceiling paint.

Water Damage

If a home or business owner notices a soft protrusion or stained spot on the ceiling, it’s a good idea to call in a professional as soon as possible. Water damage on a ceiling should not be ignored as it can lead to mold and rot, which is a serious health issue for anyone living in the building. It can also result in structural damage, such as sagging ceilings or broken joists and rafters.

A professional home repair expert can help the client find the source of the water leak to make the necessary repairs. Leaks often occur near rooms with plumbing — such as the bathroom or kitchen — but can also be due to a faulty roof, sprinkler systems, or even clogged gutters. If the leak has been occurring for a long time, it can lead to more extensive problems within the walls and elsewhere in the property.

After the source has been identified and repaired, the client will need to dry out the affected area of the ceiling. This could involve putting buckets on the floor, covering the furniture, or sealing off the room to prevent further wet spots and damage. Then, the client can proceed with spackle and paint as needed.

It’s a good idea to use an oil or shellac-based primer to protect the ceiling from future moisture and staining. This step will also ensure that the new ceiling will look uniform so that there are no visible lines from where the old and damaged areas meet.

Depending on the severity of the water damage and how long it has been occurring, the repair may be as simple as touching up with a bit of Spackle and painting, or it might require more extensive work such as replacing the entire section of the ceiling and repainting. The client will need to put their trust in a professional who is familiar with carpentry, roofing, and other construction methods for the most comprehensive repair. It is important to remember that some repairs are simply not suitable for the average homeowner, such as fixing cracks in pipes inside the walls or extensive roof damage.

Mold

Mold is not only unsightly but can also cause health problems for the people who live in the house. Mold spores can be inhaled and can lead to respiratory issues such as coughing, wheezing, throat irritation, and congestion. People with asthma may experience more severe symptoms. The key is to act quickly, especially if mold growth covers more than 10 square feet.

The best way to remove mold from a ceiling is to dry it thoroughly. If you have a dehumidifier, use it as soon as water spots appear. Otherwise, spray and scrub the area with a solution of white vinegar, borax or bleach, and hydrogen peroxide, using a scouring sponge. Scrub well, then rinse and let the surface dry completely. Be sure to wear rubber gloves and protective clothing if you’re handling mold spores directly on the ceiling.

Moisture and mold problems on the ceiling can be caused by a roof leak, condensation, or ghosting (discoloration from dirt or soot that has stuck to the ceiling). If you suspect you have a roof leak, try scanning the area with a moisture meter before starting any repairs. If the problem is condensation, you can reduce it by insulating your attic with fiberglass batts.

Black mold, on the other hand, is usually a sign of a more serious issue and must be addressed immediately before it spreads and grows. Inhaling black mold spores can cause respiratory irritation, so the first step is to fix the source of the problem. That might mean repairing a pipe or sealing a leak in the roof.

Once the source of the problem is fixed, you can proceed with removing and cleaning any remaining black mold on the ceiling. Use the same technique as with other types of mold, but make sure to wear rubber gloves and a dust mask. If you’re still having trouble, you can always call in a professional. A professional can remove and replace the mold, sand, and repaint the ceiling, as well as inspect the ceiling for any other damage or problems. They can also recommend the most effective preventative measures to take.

Deck Repair Services

How to Properly Maintain Your Deck

After the deck is cleaned and has had time to dry, applying a sealant is a good idea. It’s also the best time to replace rotten boards and nail heads and hammer in protruding nails that may have moved from swells and shrinks.

Deck

Look for signs of rot by probing structural members with a screwdriver; areas that feel soft or springy may be rotten. To learn more, visit https://www.mountjoycompany.com.

Before staining or sealing, thoroughly clean your deck to remove dirt and mildew. Choose a safe commercial cleaner for your type of deck and follow the manufacturer’s instructions for applying it. You can also mix a small amount of baking soda with water to create a paste that you can apply to mildew stains on your deck. Scrub the paste into the stains and let it dry.

For safety, wear rubber gloves and a face mask when using any cleaning products. Rinse your deck after you have scrubbed it. If the deck is slippery, you can use a spray nozzle on your garden hose to create a fine mist of water to help it dry quickly.

If your deck is made from wood, you need to inspect it for rot and damage. This includes the support posts, beams, and joists that form its structural frame. Wood rot is easy to spot, as it will be soft and spongy. You can test for it by probing a piece of wood with a screwdriver. If it splinters, the wood is healthy, but if it splits easily without splinters, it may be rotting.

You should also inspect the ledger board, which attaches the deck to your house. Make sure it is securely fastened with lag screws and that there are no gaps in the flashing. The flashing is a metal strip that protects the vulnerable connections from water damage, and it is important to install it properly.

Another safety concern is the stairs on your deck. Ensure that they are secure and that the risers and treads meet building codes for height and spacing. Stairs can become dangerous if they are not safe to climb.

If your deck has a hot tub or spa, make sure you have a drain system to prevent the buildup of water and debris underneath. You should also check that any landscaping around your deck isn’t causing negative grading, which can cause rainwater to flow down into your deck. This can rot the underside of the deck and pull it away from your home.

Inspect the Deck

The wood that makes up the deck’s frame is susceptible to damage. This is why it’s important to visually inspect the structure. If you notice rotting, sagging, or bowing, it’s time to replace the affected boards. The inspection should also focus on the area where the deck attaches to the house and any other areas that might collect water. A metal flashing is an essential piece of protection that stops moisture from leaking between the deck and the house. Check to make sure this is properly installed and that it’s free of rust and other signs of corrosion.

Using a flashlight, look underneath the deck to check for fasteners and connectors that may be in need of repair. This includes metal joist hangers and post anchors. If you see rust, they should be replaced immediately. You should also look for any signs of rot or fungus on the ledger, which is the all-important piece of framing that attaches the deck to your home. A rotten ledger is the leading cause of deck collapse, so it’s very important to keep an eye on it and take steps to protect it.

You should also examine the footings, which are the concrete foundations that hold up the deck. If they’re settling or cracking, it’s likely due to a problem with the soil beneath the deck. This is an issue that should be addressed right away to prevent the deck from collapsing in the future.

Once the deck is dry, it’s time to prepare it for staining or sealing. First, it should be cleaned thoroughly to remove any debris or moss growth that may have settled. Then it should be sanded to remove any bumps or uneven surfaces that will be impacted by the new sealant. Finally, it should be wiped down with a damp cloth to remove any excess dirt and dust that was missed when cleaning.

It’s always a good idea to have your deck professionally inspected after it has been cleaned and before you apply a stain or sealant. A professional will be able to identify any safety issues that you might have overlooked and help you get your deck up to code, such as railing heights or spacing between balusters.

Repair Damaged Boards

While powerwashing is a great way to remove mildew and dirt, it can damage the surface of some wood surfaces. Check the deck for damaged boards and replace them promptly to prevent rot. If the damage is severe enough, you may need to call in professional help to repair the problem.

Look for cracked or rotten board ends, which will eventually become loose and threaten the safety of your family and guests. It is also a good idea to look for splinters and rotten spots in between boards. If these areas are small, you can usually repair them with wood glue and a hammer or splinter claw. If you find a broken board, use a pry bar or hammer to separate the old board from its supports or stringers. Cut a new board to match the length of the existing one. Make sure that the new board is straight and level before screwing it into place. If the stringers or supports are damaged, they will need to be replaced as well.

Inspect all the framing members underneath your deck. You should particularly pay attention to the area where the posts and beams are in direct contact with the ground or footing. If you notice signs of dry rot, check the integrity of any nearby joists and replace any that are spongy or soft. You can also reinforcing a rotten section of a joist by adding a splint made of pressure-treated lumber alongside it and securing it with deck screws.

You should also inspect the metal hardware, such as joist hangers and rail connectors, for signs of rust and corrosion. You should also replace any that have become loose or corroded. You can usually re-attach loose hardware with wood glue and a hammer, but it is recommended that you use screws that are slightly longer than the nails to avoid damaging the surrounding wood.

Rearrange furniture and grills occasionally to avoid excessive wear in certain areas of the deck. Trim nearby plants and trees to keep them away from the deck to avoid moisture damage and rot. Avoid using outdoor rugs that are made from natural materials like jute or bamboo, as they will absorb moisture and promote mildew. If you must use them, choose recycled plastic rugs that won’t promote these problems.

Replace Damaged Railings

Over time, the elements will take a toll on your deck. Moisture seeping into cracks can rot or cause boards to loosen, while changing temperatures can make wood shrink and expand, causing railings to sag or even break. It’s important to regularly inspect your deck and make repairs as soon as you spot problems, to prevent costly repairs in the future.

If the railings are rotten or damaged, it’s time to replace them. This is a fairly easy DIY project that many homeowners can handle themselves. Start by removing the top cap and screws from the upper railing connectors to free it from the lower rail. Next, remove the balusters by pulling them up firmly.

Use the top of a post to mark where the new lower rail should be attached, then remove the old upper rail and railing connectors. If possible, remove the old railing in one piece to use as a template for the new one. If there are any complex angles or notches in the rail, straighten them before you pull it to lessen damage to the new part.

Screws and nails can become loose, especially with changes in temperature, so double-check the connections and tighten them as needed. If the rails are still wobbly after tightening them, consider adding additional fasteners to strengthen the connections and reduce future movement.

When you’re replacing balusters, it’s a good idea to measure and cut the new ones to the proper length to ensure they fit correctly. You can also use metal brackets or wooden blocks to reinforce the connections and help keep the rails in place.

A deck should be treated and stained or sealed annually to protect the surface from moisture, sunlight, dirt, mold and insects. Regularly cleaning and repairing your deck will extend its life and help you enjoy your outdoor space for years to come. In Ontario, it’s particularly important to protect your deck from the elements during the winter. Many homeowners cover their decks with tarps over the winter to limit moisture exposure, but it’s also essential to sweep and shovel snow regularly and to clean gutters so water isn’t directed onto the deck and freezes in place, creating ice dams that can crack and destroy the wood.

General Contractor

Kitchen Remodeling – What You Need to Know

Kitchen Remodeling Lexington KY is one of the most important upgrades homeowners can make to their home. It adds resale value, as well as functionality to the most used room in the house.

A quality kitchen remodel can save you time, money and headaches down the road. Here are a few things to keep in mind when planning your project.

The kitchen remodel design stage is where homeowners and designers collaborate to envision and plan the ideal kitchen layout and aesthetic. Kitchen remodeling professionals also use this time to select the right materials from suppliers, including kitchen countertops, sinks, faucets, backsplashes and lighting fixtures, to ensure they match the overall design vision.

Designer Kate Marker merged circa-1920s nostalgic charm and pure circa-2020 sophistication for this kitchen remodel, which included knocking down walls to open the space and adding rustic whitewashed pine beams to the ceiling. The resulting cook space is now a glamorous focal point that’s balanced by an antique blue-gray island and Amish-crafted flat-paneled cabinets.

A well-thought-out storage scheme is essential to any kitchen. Incorporate pull-out pan racks, wall-mounted pot and pan holders, or even under-counter drawers to maximize available space for cooking utensils and supplies. It’s also a good idea to include multiple electrical outlets throughout the space, particularly near your workspace. This will make it easy to charge electronic devices, such as phones, tablets, and laptops.

One of the most popular kitchen remodel trends is a transitional style that blends classic and contemporary features. In this kitchen, dark blue cabinets set a warm backdrop for stainless-steel appliances and a sleek countertop with integrated sink. A stacked tile backsplash ties the look together.

Whether you’re going for a small facelift or major transformation, you’ll want to consider your goals and budget. A minor refresh will likely yield a higher ROI than a major remodel, according to Remodeling Magazine’s Cost vs. Value Report. Regardless of what you choose, it’s important to communicate your design goals clearly to your contractor so that they can be executed on-time and within budget.

Layout

Your kitchen’s layout, a harmonious arrangement of countertops, appliances and storage spaces, is the key to making this highly-used room work well. A variety of layouts exist, but the best one will depend on the space you have available, your needs and your lifestyle. Your professional kitchen designer can help you find the right layout for your home.

One-Wall Kitchens

Often found in studio apartments and lofts, this basic layout uses cabinets and appliances along a single wall to maximize efficiency. If possible, the refrigerator should be positioned so that it opens away from the stove to avoid interfering with workflow. If you opt for this design, be sure to take advantage of vertical space by installing shelves and overhead cabinets where possible. A kitchen island also improves the functionality of this layout.

Galley Kitchens

Also known as corridor kitchens, galley layouts are a lean and efficient option for tighter spaces. Two walls facing each other characterize this kitchen layout, which keeps all working zones within easy reach. This design works well in small homes and snug condos, and can be expanded with the addition of an island.

U-Shape Kitchens

The most versatile design, the U-shaped layout provides countertop and storage space on three walls, which enables a smooth flow of workflow. However, this layout is not ideal for smaller rooms, because it can feel crowded. If you do choose this layout, be sure to install plenty of corner storage solutions, such as lazy susans, to make the most of your space.

Appliances

During a kitchen remodel, you will likely need to replace your appliances. This can be a great opportunity to upgrade your refrigerator, dishwasher, stove, oven and other essential cooking equipment. It is also a good time to consider upgrading to energy-efficient models that reduce your electricity costs and help protect the environment.

Upgrading your appliances can make a dramatic impact on the look of your kitchen. Newer appliances come in a wide range of designs that work with traditional or contemporary aesthetics. For example, you can opt for flush installation where the appliance blends in with the cabinetry. Appliances can also be customized with custom panels that match the cabinets.

Another benefit of a kitchen remodel is increased storage space for all your cooking tools and knick-knacks. Adding additional cabinets, shelving units and walk-in pantries is a great way to organize your kitchen and keep it looking clean and uncluttered.

A well-organized kitchen makes it much easier to cook, clean and manage your household. It can also improve family health and well-being by fostering social ties and making it easier to spend time together.

Kitchen remodeling can increase the number of people who can comfortably use your kitchen. Having an extra fridge and oven allows you to entertain guests without having to go out for meals. It also allows you to keep more food in the house for easy meals or snacks.

A modernized kitchen is a selling point and can attract homebuyers who appreciate the latest features and materials. You can also recoup some or all of your investment when you sell the property. Moreover, homeowners often find that they enjoy spending more time at home after undergoing a kitchen remodel.

Cabinets

Cabinets provide storage and a workspace, and can be designed in a variety of styles. They may be built in, or they can wrap around a kitchen appliance, such as a refrigerator. They are also available in a variety of materials, from solid wood to manufactured veneers. Cabinets are often the focal point of a kitchen, and a way to express a homeowner’s style.

Cabinet construction consists of a six-sided wooden box or carcass closed on five sides, with a door or drawers on the sixth. A cabinet can be framed (the door sits inside of the frame, called inset), or it can be unframed, where the door is attached to the front of the box itself, a design known as overlay. Framed cabinets tend to be used in more traditional kitchens, while overlay construction is often seen in contemporary designs.

The door style can have a significant impact on the aesthetics of the cabinets. Some doors are flat, or slab-like, and offer a clean, modern look. Others, like shaker doors, have a simple center panel that is reminiscent of vertical wall paneling. Beadboard is another popular choice, and accentuates a rustic or country kitchen design. Other doors are decorative, such as raised panels or fluted arches. Some doors are even glass, allowing homeowners to display collectibles and fine china.

The size of the cabinets depends on a family’s needs, and how the cabinetry is used. For example, a family that entertains may want more cabinets for food prep and serving, while a family with small children might prefer deep drawers to accommodate big pots and pans. Cabinets can also be arranged to maximize space by wrapping around a kitchen island, or to allow for more storage in the corners of a room.

Countertops

Kitchen counters are a focal point of any kitchen and the right surface can boost both the look and functionality of your home. There are many options available to choose from including natural stone, recycled glass, and durable laminate. When shopping for countertops, consider your budget and maintenance level. If you’re looking for a long-lasting, low-maintenance material, granite is an excellent choice. It’s resistant to heat, moisture, and chipping, and it comes in a wide array of colors to suit any decorating style.

Quartz counters are another attractive and durable option. They’re easy to clean and are stain-resistant. They come in several finishes, and they can be customized to include a backsplash. If you’re looking for a more dramatic option, consider waterfall counters. These sleek surfaces extend all the way to the floor and add a touch of modern style.

Adding custom kitchen features during a remodel can make your home stand out in the market. Prospective homebuyers tend to prioritize homes with updated kitchens, so you’ll likely recoup much of your investment when you sell your property. Additionally, kitchen remodels can improve the overall flow and efficiency of your kitchen, which can save you time and money in the long run. However, it’s important to work with a professional contractor so that your new space meets all your family’s needs and goals. They can also help you design a functional layout that suits your lifestyle and space requirements. This includes creating more storage, enhancing lighting and reorganizing the overall flow of your kitchen.

Roofing

What Do Roofers Do?

Roofers In Columbus GA install, repair, and replace the roofing systems of buildings. They may use a wide range of materials, including shingles, bitumen, and metal.

They also inspect problem roofs to determine the best roofing repairs. To perform their jobs effectively, roofers need a variety of skills. These include coordination, active listening, and critical thinking.

Roofers install, repair, and replace the roofs on homes, businesses, and other buildings. They use a variety of materials, including shingles, bitumen, and metal. Properly installed roofs protect structures from rain, snow, sunlight, and other elements. Without roofers, buildings would be vulnerable to leaks and other damage that compromises their structural integrity and energy efficiency.

Most roofers specialize in one or more types of roofing. Some focus on residential roofing, while others work on commercial or industrial roofs. Many roofers also offer additional services, such as gutter cleaning and installation, chimney sweeping, and attic insulation.

To become a roofer, you typically need a high school diploma or equivalent and trade school training. You can find a trade school with a roofing program or sign up for an apprenticeship to learn the ropes from an experienced roofer. You must also pass a background check to ensure you don’t pose a risk to the public.

Licensed roofers must carry workers’ compensation and liability insurance to cover themselves in case of an accident on the job. They should also have references from past clients who can attest to their skills and reliability. If you’re shopping around for the best price, make sure to get estimates from multiple roofers and ask for proof that they’re licensed in your state or province.

A roofing contractor oversees all aspects of a re-roofing project, from preparing the site to securing permits and inspections. They should be able to provide detailed project estimates and answer any questions you have about the process. They also have the experience to handle unexpected challenges that may arise during the project and ensure the quality of the finished product.

A roofer who focuses on service typically works on smaller jobs and has a higher emphasis on customer satisfaction. These professionals may have more flexibility with their pricing and can offer long-term warranties. They can also help you navigate the insurance claim process if your roof is damaged by hail or other incidents. Often, service roofers have a dedicated onsite person who can answer your questions and intercede with the crew for you.

Roofing Materials

Roofing materials are used to protect the top of homes, buildings, structures and other areas. These materials defend against the elements such as rain, snow and sunlight. They also provide extra insulation and enhance the exterior aesthetics. When choosing a roof material, homeowners need to consider factors such as cost, durability, climate, air quality and the structural integrity of the building. There are many roofing materials to choose from, including wood shingles and shakes, asphalt shingles, metal roofs, clay tiles and composite slate and shakes.

Shingles are one of the most common types of roofing. These are thin, wedge-shaped slabs of wood produced by precise sawing that can add an attractive rustic look to a home. They are relatively inexpensive and can last for decades. Shakes, on the other hand, are split to produce thicker wedges with a rough texture and may cost more to install.

Metal roofs are more expensive than shingles or shakes, but they can last for decades and add to a home’s value. They are durable and resistant to fire, hail, wind and salty sea air. They can be installed over existing or new roofs.

Slate is a highly durable and long-lasting roof material, but it is also very expensive. It is also heavy, which can add to the stress on a structure’s foundation. Composite slate and shakes are a cost-effective alternative to the authentic materials. They offer the appearance of cedar shakes or slate but with added durability.

Clay tiles are another highly durable and aesthetically appealing option. These are a popular choice for Spanish-style and other historic homes and can be found in a variety of colors, shapes and sizes. They are resistant to water, rot and insect damage and can last up to 100 years.

Built-up roofing, or BUR, is a low-pitch roofing system that includes several layers of materials. It starts with a layer of felt that is impregnated with asphalt and then covered with two to four more layers of felt and tar. It is most often seen in commercial buildings, but can be used on residential flat roofs.

Roofing Insurance

When a roofing contractor performs work on someone’s home, the property owner is likely going to want them to be insured in case something goes wrong. That’s because roofers are working on a high-risk job that involves construction. Therefore, the best roofing companies will have insurance to cover any damage done during the building process.

In addition to general liability insurance, a roofing company should also consider getting business interruption insurance and builder’s risk insurance. This type of small business insurance is important because it will help a roofing company pay for lost income while the work is being done to repair any damage from an accident or natural disaster.

Moreover, it will also pay for any expenses incurred to protect the business’ property from theft, fire, and other damages. Additionally, roofers should look into buying a commercial umbrella policy to provide extra protection against large lawsuits.

If the roofing company has any employees, workers’ compensation insurance is another essential coverage to consider. This type of small business insurance will pay for medical expenses, disability benefits, and death benefits if an employee is injured on the job. It’s required in most states and will prevent the roofing company from facing hefty fines.

To reduce the costs of these policies, a roofing company can buy a business owners package (BOP). This type of small business insurance typically bundles together general liability insurance, commercial auto insurance, and worker’s compensation insurance. This can help a roofing company save on premiums as well as save time by simplifying the application and underwriting process.

Lastly, if a customer complains about faulty work or improper installation, a roofing company should have professional liability insurance. This type of small business insurance will help pay for legal fees and other expenses if the roofing company is sued. This can include claims for negligence, errors and omissions in services, or inaccurate advice.

Roofers are exposed to numerous hazards on the job, so it’s important that they have the right insurance to protect themselves and their businesses. By choosing the right policies, a roofing company can stay protected and foster a strong relationship with its clients.

Roofing Safety

Getting home safely at the end of the workday is a fundamental concern for everyone, but it’s particularly important for workers in construction and roofing businesses. Since roofers work at height, they face unique risks that necessitate strict adherence to safety protocols. This includes ensuring that the right fall protection systems are in place for every job.

Residential roofers are often required to ascend to great heights for roof installations and repairs, especially in re-roofing projects. This makes it critical to provide adequate fall protection equipment and diligently enforce safety protocol. Unfortunately, this may be challenging because the drive for efficiency can skew workers’ perspectives and decision-making on job sites.

For example, if employees are required to wear safety harnesses or install guardrails on a rooftop, they might perceive these measures as an intrusive disruption to the fluidity of their workflow. Likewise, if a newcomer to the field sees more experienced coworkers maneuvering a tricky situation without comprehensive fall protection, it can ingrain a faulty mindset.

To combat this, employers can facilitate a more transparent and communicative workplace. By keeping lines of communication open with their teams, they can understand how their current fall prevention systems are working, and find ways to improve them. For instance, if an employee feels that their safety harness is too restricting or uncomfortably tight, they can ask the manufacturer for a replacement model that’s more comfortable and fits better.

The same goes for other forms of safety equipment. For example, a worker might not be properly using their ladder, or they might not be following the 4-to-1 rule (for every four feet of height, the base should be one foot away from the wall). During a toolbox talk, employers can teach employees how to correctly use their equipment and mitigate risks.

In addition to the above, a drivable dumpster like the Equipter 4000 allows workers to take supplies with them up the roof instead of lugging them on and off a ladder, saving them back strain and allowing them to focus on their work. This type of system can be a useful alternative to traditional buckets, and many manufacturers offer a variety of options that meet OSHA’s standards for anchorage points, body wear and connecting devices.