Deck Repair Services

How to Build a Deck

Building a deck requires a lot of lumber. Local residential building codes dictate the size of lumber required for various structural components of the deck.

Deck

Use batter boards and mason’s strings to plot footing locations. A rough outline drawn on the ground with boards saves time and gives you a reference for setting post bases and marking footing locations. Contact Deck Builder Stafford for professional help.

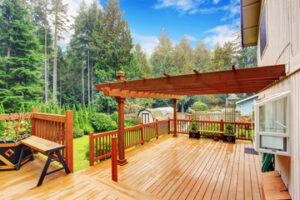
A deck is a great outdoor space that can be turned into a beautiful al fresco family room, area for entertaining or just somewhere to relax. Decks can be built in a variety of ways, depending on the location, size and shape of your property. Before construction begins, you will want to carefully consider how your deck will be used and what the weather elements will do to it. A professional contractor can help you plan the design of your deck and choose materials based on your budget and needs.

Once the foundation is complete, your contractor will begin installing the principle framework for the deck. This will include the rim joists, which form the outer edge of your deck; interior joists, which are spaced around 12 or 16 inches apart; and perpendicular beams. The rim joists will be attached to the posts you installed, while the other end will rest on top of a ledger board, or in some cases, will be anchored directly to your house framing (this requires the removal of siding).

The next step is to install the beams. In most cases, a single horizontal beam will be sufficient to support your deck; however, larger decks may require two or more of these beams. You will also need to add a number of vertical beams, depending on the layout and height of your deck. In addition, the vertical beams will need to be reinforced with shear studs or “Nelson” studs.

It is important to note that these shear studs can be difficult or impossible to locate, especially in the low points of a beam. For this reason, we recommend only drilling in the high points of a beam and avoiding the low points, where conduits may be hidden from view.

Materials

Before you can build your deck, you’ll need to gather a variety of materials. You’ll need framing lumber such as cedar, pine or fir, plus screws, nails and fasteners that are labeled for use with treated wood (i.e., stainless steel or hot-dipped galvanized). You may also need a variety of clamps such as sliding, squeeze and pipe clamps for holding pieces together. Depending on your design, you’ll also need access to a sander that features a random orbit for creating custom looks and for easing sharp edges from cuts made with a handsaw or power saw.

The type of decking material you choose will depend on your budget and the climate in your area. Pressure-treated wood is typically the least expensive decking option, but it requires staining on a yearly or every other year schedule to avoid rot and insect damage. Other wood options include tropical hardwoods such as ipe, which are known for their beauty and durability but can be more costly than other materials.

Plastic or composite lumber offers a low-maintenance alternative to traditional wood. It’s essentially made from recycled plastic, with manufacturers adding additives to make it tough enough for deck building applications. It resists rot and won’t splinter, and it’s completely weatherproof. Manufacturers can even mold surface textures to resemble graining for visual appeal.

Before you start purchasing your materials, check to see whether a permit is required for your project and what rules and regulations are in place regarding deck construction in your area. In addition, consult a span table to determine the size of joists your deck will require. These charts provide information about how much weight a joist can support, and they also detail the spacing required between each joist.

Footings

When building a deck, footings provide support and help ensure that live and dead weight are evenly distributed. They also prevent the deck from shifting and settling over time, making it easier to maintain the structure.

The footings are secured to the ground using concrete and must be a minimum of 12 inches below grade, or the local frost depth. If you’re unsure of how deep the footings should be, refer to your framing plan. They may not call out the exact location of each footing, but they will show joist spacing and centerlines. You can use a simple tape measure to mark the distance from the foundation to each end of the joist.

While digging for footings, make sure to avoid anything underground like plumbing pipes or cables that could be broken by the shovel. This is a serious safety issue and can be costly to repair. It’s also a good idea to have someone nearby who can watch for any electrical lines running under the ground that might be hit by the shovel.

One way to save on footing costs is to use a precast footer block. These are essentially blocks of concrete with holes in them for the posts. This is an alternative to traditional concrete footings, but it’s still important to check with the local building code to ensure that the blocks meet requirements such as a minimum depth and a flat surface.

A newer type of footing, called a helical pile, is driven into the ground in a similar manner to screwing in nails. These are becoming more common amongst professional contractors as they’re a quicker and easier alternative to other types of footings.

Railings

The railings of a deck provide safety and a way to dress up the overall look. They’re available in many materials, from wood and aluminum to composite and PVC. There are also a wide variety of infill styles and top rail designs, so you can build your deck to match your style.

A good rule of thumb is to use pressure-treated lumber for the beams and joists, and to use a hardwood like ipe or a premium composite material for the railing. This will help ensure the deck is safe and durable for years to come.

When it comes to the actual railing, it’s important to follow local building codes when determining the height and distance between posts. You’ll also want to make sure the top of the guardrail can withstand a 200-pound force applied to it in any direction. Many older decks’ guardrail posts weren’t strong enough for this, and building inspectors have become more vigilant about this issue.

To increase the strength of the railings, make sure the bottom rail is on edge for lateral resistance and that the top rail is horizontal to resist sagging. In addition, it’s a good idea to add a small support piece between the bottom and top rail.

If you’re using 4×4 posts, they should be notched and lag bolted to the rim joists with 3/8-inch or 1/2-inch lag screws or structural fasteners such as LedgerLoks. This will increase the strength of the connection, as the joists are able to transmit more force to the post. When you’re using steel posts, be sure the coating is intact and that no paint has sloughed off to expose the base metal. This will reduce the risk of rust and corrosion in wet climates.

Furniture and Decor

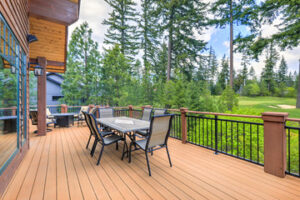
When choosing furniture and decor for your deck, consider the style of your house and how it will match with a new outdoor space. Also think about how the deck will be used. If it’s going to be a gathering spot for family and friends, you’ll want enough seating for everyone to sit together comfortably. If you plan to use the deck mostly for sunbathing, go for lounge chairs instead of a traditional dining table.

Decks made from rustic materials like wood are ideal for decorating with natural, earthy colors. Add a jute rug to warm up the floor and inject colorful decor pieces into the overall design. Bright-colored throw pillows and an accent table are great choices. You can also add a touch of color by hanging multicolored pom pom tassels or painting pots. Light fixtures that occupy floor space aren’t the best choice for small decks because they can crowd the area and make it feel cramped. Wall-mounted options are a good alternative because they don’t take up much room and provide ample illumination without taking up floor space.

If you’re planning to build a fire pit on your deck, position it along the longest wall that faces the view. Then place seating for two chairs diagonally in front of it and a coffee table between them. This asymmetrical arrangement creates a focal point while making it easy to relax by the fire and enjoy the view.

Deck building is a big project, and there’s a lot to consider before you get started. To help ensure that you’re getting the best possible outcome, choose a qualified contractor who has experience working on similar projects.

Deck Repair Services

How to Properly Maintain Your Deck

After the deck is cleaned and has had time to dry, applying a sealant is a good idea. It’s also the best time to replace rotten boards and nail heads and hammer in protruding nails that may have moved from swells and shrinks.

Deck

Look for signs of rot by probing structural members with a screwdriver; areas that feel soft or springy may be rotten.

Before staining or sealing, thoroughly clean your deck to remove dirt and mildew. Choose a safe commercial cleaner for your type of deck and follow the manufacturer’s instructions for applying it. You can also mix a small amount of baking soda with water to create a paste that you can apply to mildew stains on your deck. Scrub the paste into the stains and let it dry.

For safety, wear rubber gloves and a face mask when using any cleaning products. Rinse your deck after you have scrubbed it. If the deck is slippery, you can use a spray nozzle on your garden hose to create a fine mist of water to help it dry quickly.

If your deck is made from wood, you need to inspect it for rot and damage. This includes the support posts, beams, and joists that form its structural frame. Wood rot is easy to spot, as it will be soft and spongy. You can test for it by probing a piece of wood with a screwdriver. If it splinters, the wood is healthy, but if it splits easily without splinters, it may be rotting.

You should also inspect the ledger board, which attaches the deck to your house. Make sure it is securely fastened with lag screws and that there are no gaps in the flashing. The flashing is a metal strip that protects the vulnerable connections from water damage, and it is important to install it properly.

Another safety concern is the stairs on your deck. Ensure that they are secure and that the risers and treads meet building codes for height and spacing. Stairs can become dangerous if they are not safe to climb.

If your deck has a hot tub or spa, make sure you have a drain system to prevent the buildup of water and debris underneath. You should also check that any landscaping around your deck isn’t causing negative grading, which can cause rainwater to flow down into your deck. This can rot the underside of the deck and pull it away from your home.

Inspect the Deck

The wood that makes up the deck’s frame is susceptible to damage. This is why it’s important to visually inspect the structure. If you notice rotting, sagging, or bowing, it’s time to replace the affected boards. The inspection should also focus on the area where the deck attaches to the house and any other areas that might collect water. A metal flashing is an essential piece of protection that stops moisture from leaking between the deck and the house. Check to make sure this is properly installed and that it’s free of rust and other signs of corrosion.

Using a flashlight, look underneath the deck to check for fasteners and connectors that may be in need of repair. This includes metal joist hangers and post anchors. If you see rust, they should be replaced immediately. You should also look for any signs of rot or fungus on the ledger, which is the all-important piece of framing that attaches the deck to your home. A rotten ledger is the leading cause of deck collapse, so it’s very important to keep an eye on it and take steps to protect it.

You should also examine the footings, which are the concrete foundations that hold up the deck. If they’re settling or cracking, it’s likely due to a problem with the soil beneath the deck. This is an issue that should be addressed right away to prevent the deck from collapsing in the future.

Once the deck is dry, it’s time to prepare it for staining or sealing. First, it should be cleaned thoroughly to remove any debris or moss growth that may have settled. Then it should be sanded to remove any bumps or uneven surfaces that will be impacted by the new sealant. Finally, it should be wiped down with a damp cloth to remove any excess dirt and dust that was missed when cleaning.

It’s always a good idea to have your deck professionally inspected after it has been cleaned and before you apply a stain or sealant. A professional will be able to identify any safety issues that you might have overlooked and help you get your deck up to code, such as railing heights or spacing between balusters.

Repair Damaged Boards

While powerwashing is a great way to remove mildew and dirt, it can damage the surface of some wood surfaces. Check the deck for damaged boards and replace them promptly to prevent rot. If the damage is severe enough, you may need to call in professional help to repair the problem.

Look for cracked or rotten board ends, which will eventually become loose and threaten the safety of your family and guests. It is also a good idea to look for splinters and rotten spots in between boards. If these areas are small, you can usually repair them with wood glue and a hammer or splinter claw. If you find a broken board, use a pry bar or hammer to separate the old board from its supports or stringers. Cut a new board to match the length of the existing one. Make sure that the new board is straight and level before screwing it into place. If the stringers or supports are damaged, they will need to be replaced as well.

Inspect all the framing members underneath your deck. You should particularly pay attention to the area where the posts and beams are in direct contact with the ground or footing. If you notice signs of dry rot, check the integrity of any nearby joists and replace any that are spongy or soft. You can also reinforcing a rotten section of a joist by adding a splint made of pressure-treated lumber alongside it and securing it with deck screws.

You should also inspect the metal hardware, such as joist hangers and rail connectors, for signs of rust and corrosion. You should also replace any that have become loose or corroded. You can usually re-attach loose hardware with wood glue and a hammer, but it is recommended that you use screws that are slightly longer than the nails to avoid damaging the surrounding wood.

Rearrange furniture and grills occasionally to avoid excessive wear in certain areas of the deck. Trim nearby plants and trees to keep them away from the deck to avoid moisture damage and rot. Avoid using outdoor rugs that are made from natural materials like jute or bamboo, as they will absorb moisture and promote mildew. If you must use them, choose recycled plastic rugs that won’t promote these problems.

Replace Damaged Railings

Over time, the elements will take a toll on your deck. Moisture seeping into cracks can rot or cause boards to loosen, while changing temperatures can make wood shrink and expand, causing railings to sag or even break. It’s important to regularly inspect your deck and make repairs as soon as you spot problems, to prevent costly repairs in the future.

If the railings are rotten or damaged, it’s time to replace them. This is a fairly easy DIY project that many homeowners can handle themselves. Start by removing the top cap and screws from the upper railing connectors to free it from the lower rail. Next, remove the balusters by pulling them up firmly.

Use the top of a post to mark where the new lower rail should be attached, then remove the old upper rail and railing connectors. If possible, remove the old railing in one piece to use as a template for the new one. If there are any complex angles or notches in the rail, straighten them before you pull it to lessen damage to the new part.

Screws and nails can become loose, especially with changes in temperature, so double-check the connections and tighten them as needed. If the rails are still wobbly after tightening them, consider adding additional fasteners to strengthen the connections and reduce future movement.

When you’re replacing balusters, it’s a good idea to measure and cut the new ones to the proper length to ensure they fit correctly. You can also use metal brackets or wooden blocks to reinforce the connections and help keep the rails in place.

A deck should be treated and stained or sealed annually to protect the surface from moisture, sunlight, dirt, mold and insects. Regularly cleaning and repairing your deck will extend its life and help you enjoy your outdoor space for years to come. In Ontario, it’s particularly important to protect your deck from the elements during the winter. Many homeowners cover their decks with tarps over the winter to limit moisture exposure, but it’s also essential to sweep and shovel snow regularly and to clean gutters so water isn’t directed onto the deck and freezes in place, creating ice dams that can crack and destroy the wood.